Contributed by Roy Myklebust / Norway
Norway
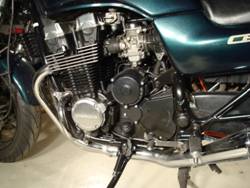
Factory Pro shift kit for Honda CB750 Nighthawk
I’ve had considerable shifting trouble with my 1997 Honda Nighthawk, primarily from first to second gear. When it warmed up the gears would grind as if they couldn’t mesh properly. The only way to get a smooth shift was to wait between first and second until the gears had slowed enough to make a reasonably smooth shift.
Having searched the net for a solution I came across the Factory Pro shift kit and thought “What have I got to lose?” Well, this turned out to be the answer to my problems. What follows is a description of the installation procedure and the problems I encountered.
To begin with the procedure is very straightforward and does not entail any
major removal of parts. Having said that I must warn you that this
installation is not for people with little or no mechanical experience.
Before you start make sure the transmission is in neutral and on the center
stand. (ed: In general, older bikes must be in neutral to line up pawls, gear
teeth in the shift mechanism. Newer design transmissions. like designed in the
mid 90's or later, don't have to be in neutral).
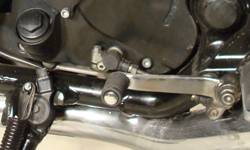
After draining the oil the first step is to remove the gear shift assembly:
Remove the shift arm's 6mm bolt completely and use a tap a screwdriver in the clamp's slot to spread clamp. There is a small dot on the shaft and the clamp that align when you replace the arm.
The next step is to remove the chain guard cover:
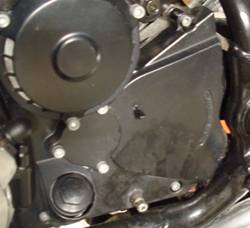
There six screws with allen wrench (umbraco) heads. It takes a little fiddling but you can maneuver the cover off the by twisting and turning. You might as well take off the side stand switch right away because it will just be in your way throughout the procedure.
Now you have to remove the neutral switch from the case cover:
Here is where I encountered one of my biggest problems. No amount of twisting, hammering or cursing made those two Phillips head screws come loose. I broke the tip of two screwdrivers trying to break them loose. I stopped short of rounding out the two screws and finally decided to remove the cover anyway realizing that there is no way I can replace it without removing the switch. If I had an impact screw remover I might have made it but I am no longer a mechanic and don’t have a fully packed toolbox. The end of the story was that I had to clamp the cover onto my workbench and use a chisel to back out the screws by hitting them tangentially. I was fully prepared to cut them off and drill out the holes. (ed: buy an inexpensive hammer impact driver and it's easy)
The next step is to remove the cover itself. There are five bolts where one of them has a copper washer. It’s important to note the placement of that bolt. The two bolts at the bottom are very difficult to reach and require an offset boxed end 8 mm wrench. Buy this before you start!
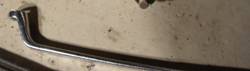
You may as well take out the two screws on the heat shield and loosen the middle screw to get a little more room. The middle screw won’t come out due to clearance. Be aware that the lower two bolts on the case can only be removed with the cover as it’s being maneuvered off.
After the bolts are removed the cover may be hesitant to come loose. I had to use the shaft of my hammer to tap it loose. When removing the cover remember to pull the shifting shaft out at the same time and release it from the gear assembly.
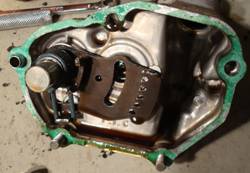
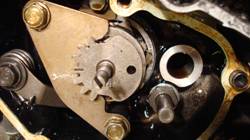
Notice the hole in the middle of the shifting assembly. It will be used when reassembling to line up the gears. The corresponding lineup hole is behind the neutral switch.
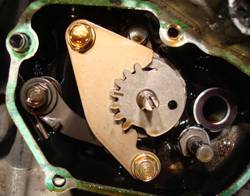
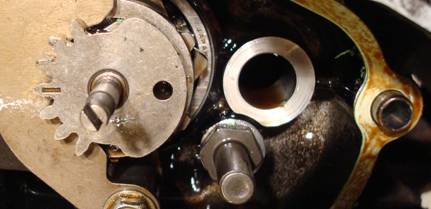
Here you see the cover plate that holds the shifting assembly in place. Remove the two bolts and carefully slide the plate out. To the right you see the hole for the shaft assembly removed earlier. Remove the two cover plate dowel pin guides to ensure that they don’t fall into the oil return hole.
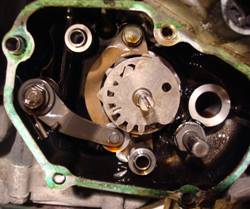
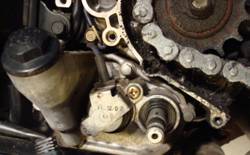
Now we come to the root of the problem with the early Honda transmissions. (finally!) The detent arm and the spring is what must be changed. Here you have to be VERY CAREFUL! Behind the arm is an oil return hole large enough to lose objects into the sump. Start by placing the end of a rag into the hole.
Proceed by removing the bolt retaining the detent arm and spring. Behind the spring is a washer that must follow with the arm and spring when removing them. After you have removed the arm you will find it supported by a collar. The next step is tricky. I read on another forum where someone suggested pre compressing the spring and retaining it with a small nylon zip strap. This works but watch your fingers! When that spring pops away you may end up holding your hand screaming for five minutes. (Don’t ask how I know…) (ed: Ed knows how, too)
Now assemble the arm, collar, spring and washers and install it in place. Everything will be loosely in place while you start the threads of the bolt. Be sure the spring is correctly mounted to the arm and tighten the assembly just enough to bring everything together. Snip the zip strap and snake it out from behind the spring. Now begin to tighten down the bolt as you work the arm with a large screwdriver. This is important! If you don’t work the arm the collar won’t seat properly and you will get a false feedback which may cause the whole thing to loosen later as you’re driving. You will see and feel when the washer centers on the collar. Actuate the arm to check that it is functioning as it supposed to.
An important warning: I managed to lose the rear retaining washer into the oil return hole when I removed the arm assembly. The rear washer will drop off and slide into the hole if you haven’t blocked it somehow. Luckily I had a telescopic magnet that I could bend and fish out the washer. I guess I won’t be winning the Lottery this year having used up all my luck on this…
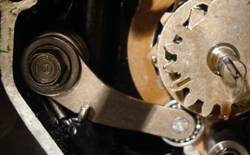
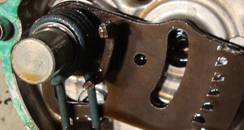
Here the new arm is in place. Now carefully replace the cover plate for the shifting gear.
Now scrape off the old gasket, replace the guides and install the new gasket. I’m a fan of Permatex so I spread a very thin layer on both sides of the gasket. The next step is to reinstall the shifting assembly and cover. This requires some dexterity as you must have the shifter lined up with a centering pin as you maneuver it in place. Behind the neutral switch is a tiny screw that covers the line up hole. (id: if using a new gasket and the case and cover surfaces are clean, you can skip the gasket sealer)

Remove this and insert a long thin Phillips or a long scribe and make sure it goes through the lineup hole in the shifter assembly. Be sure the thrust washer is placed on the shaft.
Before you begin the reinstallation of the cover and shifting arm be absolutely sure the shifting gear is pointed directly forward. Otherwise you may not be able to shift gears. Remember! The transmission must be in neutral during the whole procedure!
When you believe the cover is in place you should be able to push it up to the point where you can feel a small gap between the engine and the cover. The spring in the shifting arm will push it a little away but there should not be a large gap. DO NOT try to force it into place by tightening the bolts. This is incorrect! It should fall into place. Proceed after tightening the bolts evenly.

Now do not hurry to finish. Mount the shifting arm in place and check your gears!! If it don’t work now it won’t work any better on the road…
When you’re satisfied that every gear is there then you can continue with the neutral switch installation. The switch has a line up mark on the rubber gasket for the center arm. Reinstall the chain cover.
Congratulations! You have successfully completed the Factory Pro shift kit installation. Remember to refill the oil before taking your lovely out for a ride. Afterwards you can take your wife or girlfriend out also. J
As I mentioned earlier this kit solved my shifting problems. As long as everything else is in order I’m sure you find a greatly improved performance on your bike also. These instructions may seem unnecessarily long but I have tried to include as much information as possible to make the job easier for those who don’t have a great deal of experience with a wench. Remember! Use common sense! If the bolt won’t come out or the assembly won’t go in, don’t force it. Find out why and have alternatives ready. And watch that oil return hole.
Good Luck Mr. Phelps…
Sincerely,
Roy Myklebust
Norway
November 14, 2010