|

EC997 Dynamometer
Calibration Routine
To be done monthly
The Speed Calibration routine verifies the
EC997's ability to measure Speed and RPM to 1/2048th accuracy.
The
Load Cell Calibration routine
verifies the EC997's ability to measure torque to better than 1/100th
of a pound.
The Speed / Load Calibration routine verifies
the EC997's firmware and software settings to calculate power based
on the verified Speed and verified Load Cell values.
|
Check Dyne Speed Calibration:
- Turn
OFF PAU box power.
- Turn ON black box (DAQ unit) power, computer
and EC997 software (as normal).
- Stay on Graph Screen.
- Unscrew mil spec connector from the dyno's
speed sensor and unplug cable.
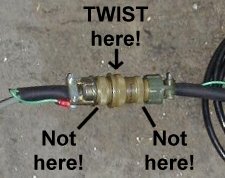
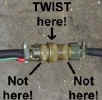
- Unscrew the CENTER threaded ring (not the two outer rings,
or you will twist and short the cables) - click here.
- Install Factory Pro Speed Calibration
Unit (SCU) to sensor cable (replacing the dyno's speed sensor).
- Select any Reference File and click "Go to Test".
- On the "Test Setup" screen,
Change "Starting RPM" to 5000 rpm (anything over 3000 rpm is ok).
Set "Tach Ratio" to "1.0" (the reason for the "1.0" will be apparent
later)
- Now, go to the Test Screen.
- If the EC brake comes on, you missed step
1.
- The SCU is generating a calibrated or
2048 and the Speed readout on Test Screen should read: ~77.62 mph
(if you are using a tach ratio of 1.0).
- Tach should read 2048 rpm. (if you are
using a tach ratio of 1.0)
- ~77.62 and 2048 rpm? Good!
- Remove SCU and reattach cable to the dyno speed sensor.
- Replace EC brake cover and turn on power at PAU box.
If you have the SCU installed to the speed
sensor connector, using a tach ratio of 1.0 and you do not see 2048
rpm and ~77.62 mph, write down what is displayed and call Tech Support
at 800 869-0497. It is important that you write down what rpm and speed
is displayed.
If it's a new installation, you can call Tech
Support and then proceed to the Calibration Routine. If existing setup,
DO NOT recalibrate the Speed Sensor before contacting Tech Support.
If it's a new
|
| To be done after contacting
Tech Support!
Dyne Speed Calibration:
-
Turn
OFF PAU box power.
- Turn ON black box (DAQ unit) power, computer
and EC997 software (as normal).
- Unscrew mil spec connector from center
and unplug cable from dyno's speed sensor.
- Install Factory Pro Speed Calibration
Unit (SCU) to sensor cable (replacing the speed sensor).
- Go to Graph
Screen
- On Main menu, click Tools / "Calibrate
DAQ unit".
- On the RH side of the box that pops up,
write: 2048 in the data entry box to the right of "Span
to:".
- Then click on the "Span to:" button. It
will take a few moments to get several thousand samples and arrive
at a value.
- You will see ~2048 and 77.62 mph appear
to the left.
- If you see ~2048 and 77.62, good -
now click on "Write INI" and the calibration will be saved permanently.
- Close that box. Now.....
- Select some reference file and click "Go to Test".
- On the "Test Setup" screen,
Change "Starting RPM" to 5000 rpm (anything over 3000 rpm is ok).
Set "Tach Ratio" to "1.0" (the reason for the "1.0" will be apparent
later)
- Now, go to the Test Screen.
- If the EC brake comes on, you missed step
1.
- Speed readout on Test Screen should read:
~77.62 mph.
- ~77.62? Good!
- Remove SCU and reattach cable to the dyno speed sensor.
- Replace EC brake cover and turn on power at PAU box.
|
Load Cell Calibration
- Turn OFF PAU box power.
- Remove the cover of the Factory pro eddy
current brake.
- Go to
Test Screen, main menu / setup
- Click on Calibrate Load cell.
- Check that the top green box contains
the number that is stamped on your calibration weight.
- Sometimes an update will change it
to a default value.
- With no calibration weight on the brake's
torque arm, click ZERO.
- The red box in the bottom right should
read .000 and flicker a few thousandths of a pound.
- It's a raw, unaveraged readout
of the load cell, hence the "alive" appearing reading.
- Calibration weight: Carefully set the
calibration weight on the torque arm of the brake.
- Do NOT drop the weight on the arm
or you will damage the load cell.
- Go to he program and click "Span". The
red box should read the calibration weight (with a few thousandths
of flicker).
- Remove the calibration weight and the
red box should read approx. the Zero weight again.
- When you verify that you can place and
remove the calibration weight, click: Save and return to test.
- Replace the EC brake cover and turn PAU
box power back on.
|
Speed / Load / Power Check
- Calibrate Load cell with calibration weight
(above)
- Calibrate Speed Calibration with (above)
- With calibration weight
OFF the
torque arm, PAU power OFF and SCU installed, speed should read 77.62mph
and parasitic generated power should read:
- On single roller, 12.875 diameter
drive roller MC dyne: aprox. 1.7 +/- .1 hp
- On dual coupled roller, direct
drive MC/Quad dyne: xxhp
- On belt drive, dual coupled,
drive roller MC/Quad dyne: xxhp
- With calibration weight, YES ON
on the torque arm, PAU power OFF and SCU installed, speed should
read 77.62 mph and parasitic generated power should read:
- On single roller, 12.875 diameter
drive roller MC dyne: aprox. 21 +/- .5 hp
- On dual coupled roller, direct
drive MC/Quad dyne: xxhp
- On belt drive, dual coupled,
drive roller MC/Quad dyne: xxhp
|
|
I would do this monthly:
Load Cell Calibration
Speed Sensor Calibration
Grease bearings (Mobilith AW2
grease avail. direct from Factory)
|
| |