415 472 4962 marc@factorypro.com
Regular "Delimit" Flash for racebikes Remove high rpm power restriction
that this Suzuki has.
Control Secondaries
Change rev limiter
Modify ignition timing
$375
With 35+ years of tuning experience, Factory Pro knows that the key
to silky smooth and strong running is individualized, perfect
tuning on each bike - That's why we do race and trackday tuning for people all over
the west coast and Nevada.
Get your reflash and custom race bike tune at Wheelsmith in San Rafael CA.
(415) 472-4962
Reflashing is NOT performed on CA bikes that are used on public
roads.
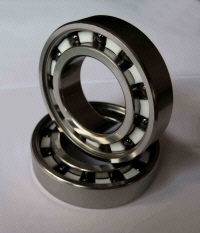
Hybrid Ceramic Wheel Bearings
$99.95
2 bearing kit
front wheel only
pn: BE-HYCER-S70-FR
Hybrid Ceramic Wheel Bearings
2 front wheel bearings
Tough 52100 steel races, rubber seals and
lightweight, almost friction free, silicon nitride
ceramic balls.
Bearings are pregreased and ready to use.
Bearings have rubber seals that are easy to
remove if desired.
To get dynojet HP, multiply True x 1.15 - to get Superflow HP, multiply
x 1.18, to get Fuchs HP - Oh forget it! They all have the real HP number
and then they inflate it so it reads higher on their dyno - expecting
that they will sell more dynos if they make their dyno read higher than
the other company's dyno. It so sad that some top 100 dealerships
actually buy a dyno because it inflates HP more than another......
Me, being the marketing wizard that I am .... (not! :-) decided to start
out telling the honest truth, years ago.
True HPtm is the actual amount of HP really
delivered to the rear wheel.
It's not "dyno loading specific", it's not "apparent only on a dyno
hp", it's not "only there under inertia loading" - It's real power,
measured against a real, lifelike, "load" - as the bike experiences in
the real world -
At least 10% of the dyno buying facilities in the USA have decided to
go with honesty and real HP - using the EC997 Dyne systems as used at
the best of tuning centers - The Factory Pro Tuning Centers
You'll see them in F-USA - you'll see them as the winners of the biggest
classes in WERA National Championships, you'll see them as multiple
World Suzuki Cup Champions, you'll see them as the 2004 National USA
Endurance Champions, too - They don't get fooled - they all use Factory
Pro EC997 dyne systems for True HP.
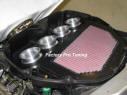
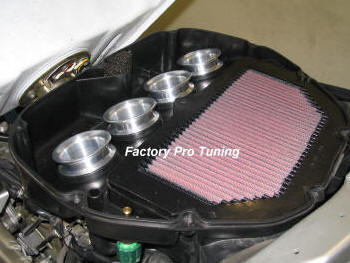
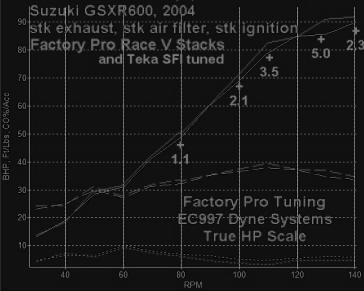
Anyway.... the stacks.......
OK - the above dyno chart shows the power difference between a bike with
stock exhaust and stock air filter, tuned to make best power with the
TEKA SFI Programmer (no pc3!) and we changed just the stacks and
retrimmed the fuel with the TEKA.
You can see on the 2 lower red and blue lines that we didn't change the
mixture very much.
The original stock Suzuki "short" stacks have the same problem as the
Graves stacks on the fi R6's - there's simply restricted airflow at high
rpms to make optimal power at very high rpms - insufficient radius /
flare. Interestingly, I think that they would only work well on a flow
bench if you didn't duplicate the actual intake velocity and used low,
typical flowbench velocities -
The results are typical for our
patented v stacks - The Factory
Pro stacks are shaped better than stock, so they propagate and
recover the intake wave more efficiently, as shown by the "meatier"
upper midrange and make more power at redline, due to the improved flow
rates at higher velocities.
Actually, as it turns out, the "short" stock Suzuki
stacks, after the radius problems were worked out, were "too short".
They use a shorter stack to bias the high rpm power, with poor wave
rates - We used better wave rates and then we could lengthen the intake
tract length to get more midrange power. We ended up with better top
(flow related) and better upper mid (wave rate).
<<<<< go over there...
The eternal battle in V stack development (notice
I didn't say "design") is that what works best on a flow bench is NOT
what works optimally "on" an engine - and what "perfect" intake tract
length "calculates" as best.... is only "best" by accidental
coincidence.
There has only been one manufacturer and then, on only
one of their models, (as of
April,05, we've done ~20 successful v stack R&D projects) that has had a
set of stock stacks that simply worked as well as they possible could -
Congratulations!
But I digress........ Buy these stacks for your 600 -
get the power up to competitive levels - It takes about 1/2 hour to
install and it's easy to do.
They work a lot better than stock and you don't have to modify your
airbox to get that 2 to 5 True HP. It's as much power gain as some
exhaust systems deliver.
Hmmm..... that might be legal for AMA Supersport racing (I'm not
asking)?.... You "could" call them "air jets", couldn't you? :-)
Legal for F-USA racing, AFM Production racing and they are not larger
than the original inlet hole if CCS rules that way.
Just rode it, still at least 10x
better than stock!
Casey Cowen July 2020
From: GraVitY 0
Subject: Re: Short Shift kit * Start for '06 GSX-R 750....
*smile*
Thanks, reason I asked is that I own a shift star and the arm with BB
for my SV and I love it. But at the time I ordered it you needed to
make more. :D
I'll be most likely calling
you in the near future.
Michael
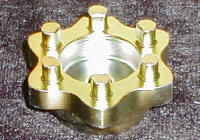
Factory Pro's Shift STAR
The "Paddle Shifter" for your foot -
The Suzuki's (along with just about every other bike) need
help in shifting. Track tests report that 2nd gear had a repeatable
ability to pop out into "neutral" under hard acceleration and
downshifting is not as seamless as it could be -
Aside from that, the late style gsxr shift action is very flat feeling
and gives very little tactile feedback as to confidence that it's really
in gear or not. I hate it when you shift and you can hear the shift
mechanism sort of lazily "kathwaka" into it's final gear
location. I like a confident, proper "snick"!
They had it so close to "almost good" in 99 - I'm not
sure why they changed it for the "non-better".... Oh well -
After redesigning and testing and redesigning and testing, and
redesigning and testing...... I now see how easy it is to get it wrong,
though.
We have a new detent "star" with a copyrighted profile (yep,
the "science failed, so, it's artwork - so it's copyrighted) that
includes a particular combination of compound arcs and radii that
produces a shift action that makes it almost impossible to miss a shift
("almost" is the key word here!), especially 2nd gear. At
least, if you miss 2nd, now, you will be REALLY surprised - cause it's
now a rare occurrence.
Downshifting confidence is 100% easier and better, also. Maybe that's
just as important as not missing upshifts.
I'm happy with the "star" and couldn't possibly change it for
the better and I figure that it will take Suzuki 4 years to copy it!
Beautifully machined on 8 Axis CNC machinery, machined from solid Cro-Mo
steel bar stock, heat treated, Gold Zinc plated, a complex radii,
beautiful part.
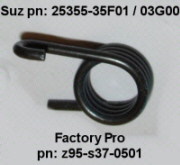
original:
25355-35F01-RH /
25355-03G00-RH
F-Pro Shift Spring pn:
z95-s69-0201/0501
$49.95
F-Pro
Competition Shift Spring
Miss fewer shifts. Fewer false neutrals.
Suggest the Star + Spring for best results.
Helps speed up shifting because the shift drum rotates quicker
between shifts.
Combine with the F-Pro Shift Star
for the sweetest results.
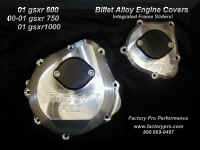
NOT a simple, "knocked off" copy, machined from billet cover - these
are the covers responsible for saving more engines from destruction
and kept more racetracks cleaner than, perhaps, all other aftermarket
"billet" covers combined!
For Race or Street
use. Absolutely the strongest cover you can buy. Highest strength / weight ratio
available! Maximum protection at ~1 pound of additional weight!
More cover thickness than stock on both RH and LH side covers.
Visible on LH and RH side - Can be show polished to a mirror finish!
Includes: Integral SLIDERS, Billet Covers, gaskets and replacement stainless steel allen screws.
I ran Factory Pro engine
covers on my rookie season in 2005 as a Novice rider with the
CMRA. As you know us rookies tend to crash a bit more than
others. I'm sure I'm not the first to say the covers and
sliders ROCK! On several lowsides throughout the season the
bike slid on the sliders and never once tumbled. I
contribute this to the position on the slider on the bike.
Friends with conventional sliders found the slider digging in
and flipping the bike causing much damage. Needless to say, my
season ended in one Championship and two 3rd places. CMRA seen
fit to bump me to expert in 2006. I purchased two brand new
GSXR's and have already installed Factory Pro covers on the one
through RaceworX in Dallas. Unfortunately I had the chance once
again on December 20th at MSR Houston to test them out. Once
again they performed great!!!! The bike slid on the slider.
Beside a few scrapes on the plastic the bike was not damaged.
With this said I feel like I could represent
your product with much confidence! If you offer a support
program I would be glad to participate. As I said, I have
already purchased a set for the Superbike. I'm only in need of
a left side stator cover for the 06 GSXR 1000. Attached is a
copy of my resume along with a rendering on the new paint scheme
for the 2006 season.
I feel the your product has saved me a ton
of $$$$ in crash repairs over the past season.
Thanks again,
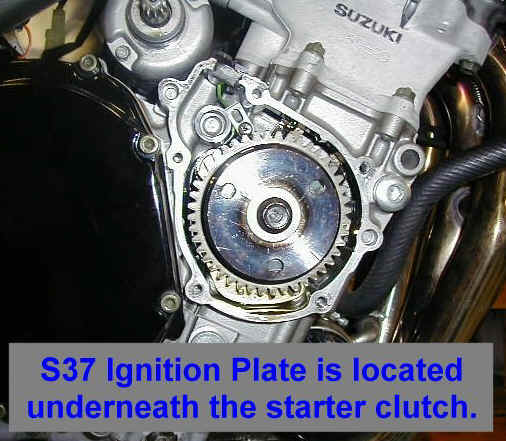
1. Remove the outer "palm sized" small starter cover
(already removed).
2. Remove the inner, larger starter clutch cover (already removed).
Remember, there is a screw in the upper left of the inner cover that is not accessible
until the small, outer cover is removed. You will probably reuse the gasket
3. Remove the starter clutch bolt with a 14mm air wrench (that's the
easiest and quickest way).
4. Remove the original ignition plate from the engine cases with a #2
Phillips screwdriver. (it's under the starter clutch gear)
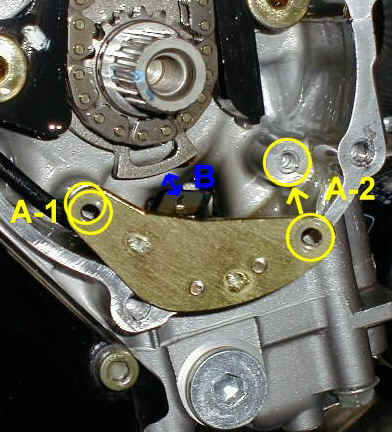
5. With a flatbladed screwdriver, remove the ignition trigger
coil from the original mounting plate and reinstall it onto the new Factory
Pro ignition plate.
Be careful NOT to stab yourself with the screwdriver!
Note: The gold
center core plate (at
B, down arrow) of the
coil assembly MUST extent "proud" of the surrounding off-white
epoxy area when
installed and tightened. There is a small amount of play to adjust with, and it must
project outwards, towards the ignition rotor, usually ~.005" to .010".
(In other words, a real little bit) If the center core is below the off-white surrounding area, the voltage produced
will detrimentally affect the ignition system and make the engine difficult or impossible
to start.
6. After installing the trigger coil to the ignition plate, temporarily reinstall the
starter clutch and bolt and rotate the engine so that rotor projection at
B, up arrow
is aligned with the trigger coil (so you can measure the trigger coil
clearance).
8. Measure the clearance at B. It should be
.015" to .020". Adjust by loosening A-1 and A-2 and pushing the plate towards the
rotor. Tighten screws when done. Notes:
1. .040" pickup coil to ignition rotor clearance will make the engine difficult or impossible
to start.
2. So - you cracked the magnet because
you didn't line up the locating hole......
It's OK - just put the 2 pieces together and
retighten the 2 flat bladed screws. Lucky you!
Question: If .040" clearance will make the engine difficult to start,
and .020 starts well, is .010" better? Haven't had time to test that, yet...
9. Check the tightness of the coil plate screws,
reinstall the ignition plate. Use a bit of light strength thread locking compound on the
screws if you want, for a good job.
10. Reinstall the starter clutch and mounting bolt.
BE SURE to line up the indexing marks on the crankshaft end and the starter clutch or the
TDC marks will be wrong and that could cause big problems if using the TDC marks to adjust
the valves later.....
11. Reinstall the covers (don't forget the screw under the small cover). Replace
or reseal gaskets as necessary.
12. You should not have any parts left over, except for the old ignition plate.
And most
importantly
Restart back at the HOME page and click on the red box in
the top left to find the bike that you want parts for...
restart at HOME page
This Tuning Site has been visited by
people. www.digits.net - the
oldest counting service on the web
We use a variety of proven drills and training techniques.
Practicing these techniques with our Yamaha dirt track trainers will
enhance your abilities both on the track or the street.
It doesn't matter what you ride or race, the Rich Oliver Mystery School
improves everyone's skill level and mindset!
WW2 vintage flying Special
Book a sightseeing flight over the Wine Country
or a Kamikaze aerobatic flight or a biplane flight over famous
Sonoma Raceway,
the Golden Gate Bridge and the San Francisco Bay for one or two during
the spring and get a free souvenir t shirt!
(NEW! Ask about the P-40 flights!)
707 938 2444
Just tell them that you
saw this on the Factory Pro website!
Marc
Northern California's most unforgettable flying experience. No
experience required. Open weekends!
The extension of the laboratory
for engines of the Swiss Federal Institute of Technology was completed
in about 1935. Its architect was Rudolf Otto Salvisberg (1882-1940).
He had a successful career in Berlin but returned to Switzerland after
the advent of the Nazis. His architectural style was somewhat similar
to that of Erich Mendelsohn. The staircase of the laboratory is in normal
use but well preserved.
Edited to the tunes of Chemical Residue by Herbie Hancock.

![[Most Recent Quotes from www.kitco.com]](http://kitco.com/images/live/s_gold.gif)